액티비티 살펴보기
액티비티 살펴보기 액티비티(Activity)는 사용자 인터페이스 화면을 관리하는 컴포넌트이다. 액티비티 역할을 하기 위해서는 Activity 클래스를 상속해야 하며, 액티비티가 기본적으로 가지고 있는 생명주기 메소드를 재정의해서 원하는 기능을 구현해야 한다.
코드 HelloWorld 클래스의 Activity
public class HelloWorld extends Activity {
    @Override
    public void onCreate(Bundle savedInstanceState) {
        super.onCreate(savedInstanceState);
        setContentView(R.layout.main);
    }
}
액티비티의 onCreate() 메소드에서는 setContentView() 메소드를 호출하고 있다. setContentView() 메소드는 주어진 R.layout.main을 가지고 화면 구성을 한다. R.layout.main은 실제로 /res/layout/main.xml을 가리킨다. 이에 대한 자세한 내용은 조금 뒤에 있는 "TIP & TECH 안드로이드가 리소스를 접근하는 방법"을 살펴보기 바란다.
코드 /res/layout/main.xml
<?xml version="1.0" encoding="utf-8"?>
<LinearLayout xmlns:android="http://schemas.android.com/apk/res/android"
    android:orientation="vertical"
    android:layout_width="match_parent"
    android:layout_height="match_parent"
    >
<TextView
    android:layout_width="match_parent"
    android:layout_height="wrap_content"
    android:text="@string/hello"
    />
</LinearLayout>
/res/layout 디렉터리에 작성된 main.xml은 화면에 보이는 레이아웃을 정의하는 역할을 한다. LinearLayout은 LinearLayout 내부에 정의된 뷰들을 수직이나 수평으로 나열하는 역할을 하는 레이아웃이다. 지금 예제에서는 android:orientation="vertical"로 정의되어 있기 때문에 뷰들이 위에서부터 아래 방향인 수직으로 보여지게 된다. 그리고 TextView는 문자열을 보여주는 역할을 하며, 문자열은 android:text에 지정하면 된다. @string/hello에 대해서는 다음의 TIP & TECH을 참고하기 바란다. 또한 LinearLayout과 TextView에 대해서는 나중에 자세히 살펴볼테니 지금은 이런게 있구나 하고 넘어가기 바란다.
액티비티의 특징을 간단히 정리하면 다음과 같다.
정리 액티비티(Activity) 특징
- 액티비티의 크기는 상태바(Status Bar) 영역을 제외한 화면 전체로 고정(원하는 위치에 원하는 크기로 변경할 수 없음)
- 두 개의 액티비티를 동시에 보여줄 수 없음
- 다른 애플리케이션의 액티비티를 불러낼 수 있음
- 액티비티 내에는 프래그먼트(Fragment)를 추가하여 화면을 분할하여 별도로 조작할 수 있음
TIP & TECH 안드로이드가 리소스를 접근하는 방법
onCreate() 메소드의 setContentView(R.layout.main)는 R.layout.main으로 화면 구성을 한다. 이때 R.layout.main이 무엇인지 많이 궁금할 것이다. R.layout.main은 R 클래스(R.java) 내에 작성되어 있는 정적 클래스(static class)의 정적 변수(static variable)를 가리킨다. R 클래스는 안드로이드 빌드 시스템에 의해 자동으로 생성되는 자바 클래스이며, 이 클래스는 리소스를 효율적으로 접근할 수 있도록 리소스를 int 값으로 관리하는 역할을 한다. 그래서 다음 그림의 오른쪽과 같은 자바 코드를 생성한다. 이 코드를 잘 보면 R 클래스의 모든 클래스와 변수가 static으로 선언되어 있다는 것을 알 수 있다. 이렇게 static으로 선언되면 별도의 객체 생성을 하지 않고도 접근할 수 있게 되어 R.layout.main과 같은 자바 코드를 사용할 수 있게 된다.
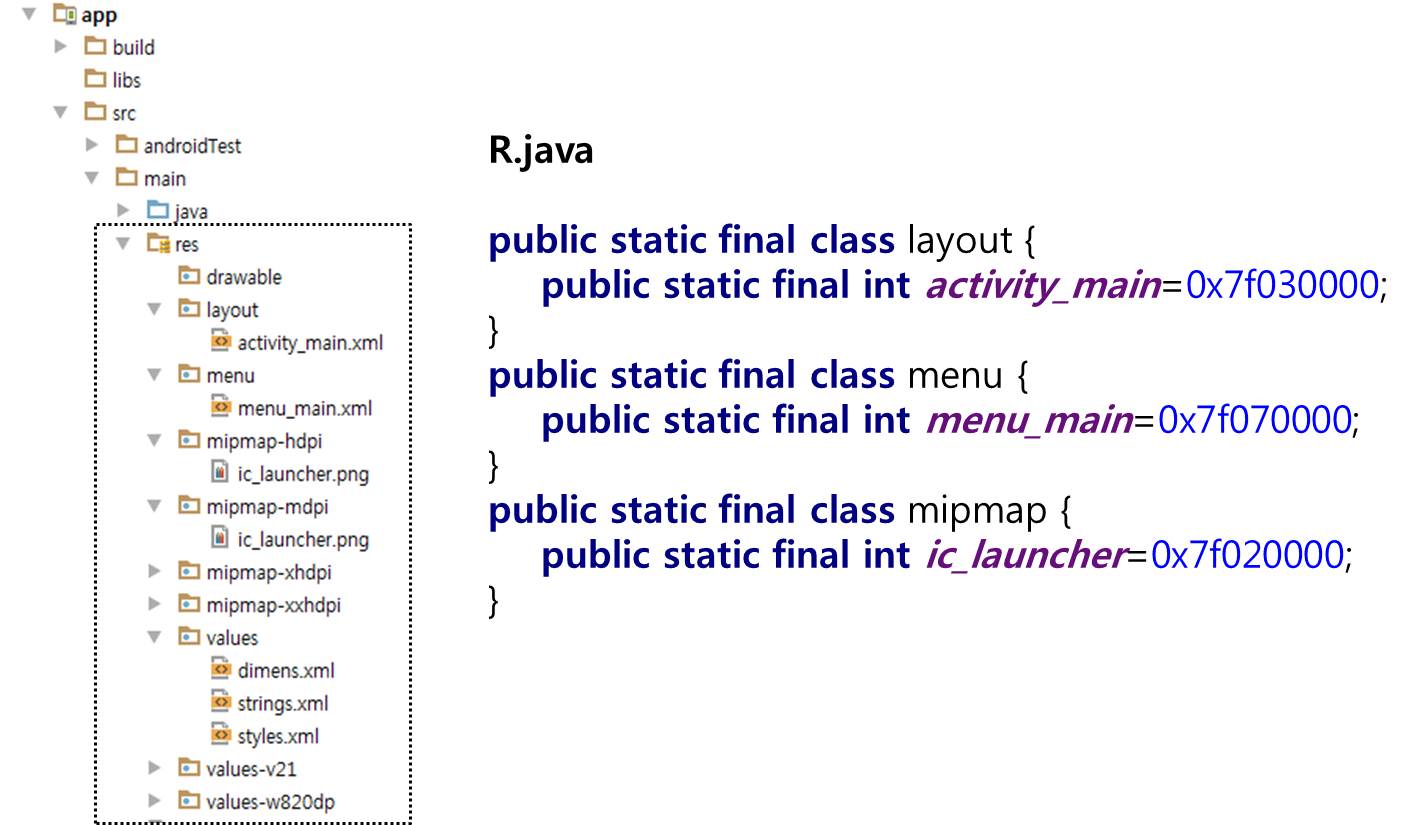
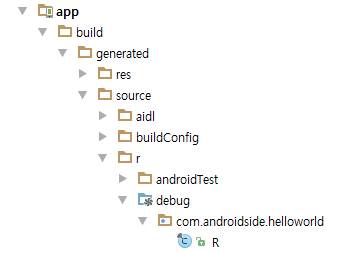
R.java는 다음 경로에 자동으로 생성되는 파일이므로 수정하지 말아야 하며 수정해도 수정된 내용이 반영되지 않는다. HelloWorld/app/build/generated/source/r/debug/com/androidside/helloworld/R.java
 `
다음은 R.java의 실제 내용이다. 모든 리소스를 R 클래스의 static int 변수로 생성한 것을 볼 수 있다.
`
다음은 R.java의 실제 내용이다. 모든 리소스를 R 클래스의 static int 변수로 생성한 것을 볼 수 있다.
/* AUTO-GENERATED FILE.  DO NOT MODIFY.
 *
 * This class was automatically generated by the
 * aapt tool from the resource data it found.  It
 * should not be modified by hand.
 */

package com.androidside.helloworld;

public final class R {
    public static final class attr {
    }
    public static final class dimen {
        public static final int activity_horizontal_margin=0x7f050000;
        public static final int activity_vertical_margin=0x7f050001;
    }
    public static final class id {
        public static final int action_settings=0x7f080000;
    }
    public static final class layout {
        public static final int activity_main=0x7f030000;
    }
    public static final class menu {
        public static final int menu_main=0x7f070000;
    }
    public static final class mipmap {
        public static final int ic_launcher=0x7f020000;
    }
    public static final class string {
        public static final int action_settings=0x7f060000;
        public static final int app_name=0x7f060001;
        public static final int hello_world=0x7f060002;
    }
    public static final class style {
        /**  Customize your theme here.
         */
        public static final int AppTheme=0x7f040000;
    }
}
참고로, mipmap 디렉토리는 hdpi, ldpi, mdpi 등으로 구분되어 있고 그 안에 동일한 이미지인 ic_luncher.png가 있지만, 실제 R 클래스에서는 ic_luncher가 한 개만 선언되어 있다. 이렇게 ic_luncher가 한 개만 선언되어 있더라도 안드로이드는 실행 시간에 적당한 drawable 디렉터리를 선택하고 그 안의 이미지를 매칭시켜준다.
자바 코드에서는 리소스 자원을 R.mipmap.icon, R.layout.main, R.string.app_name처럼 접근할 수 있으며 XML에서는 @mipmap/icon, @string/hello로 접근할 수 있다.